The Building Blocks of VFX: Textures, Meshes, and Shaders Explained
Jun 19, 2026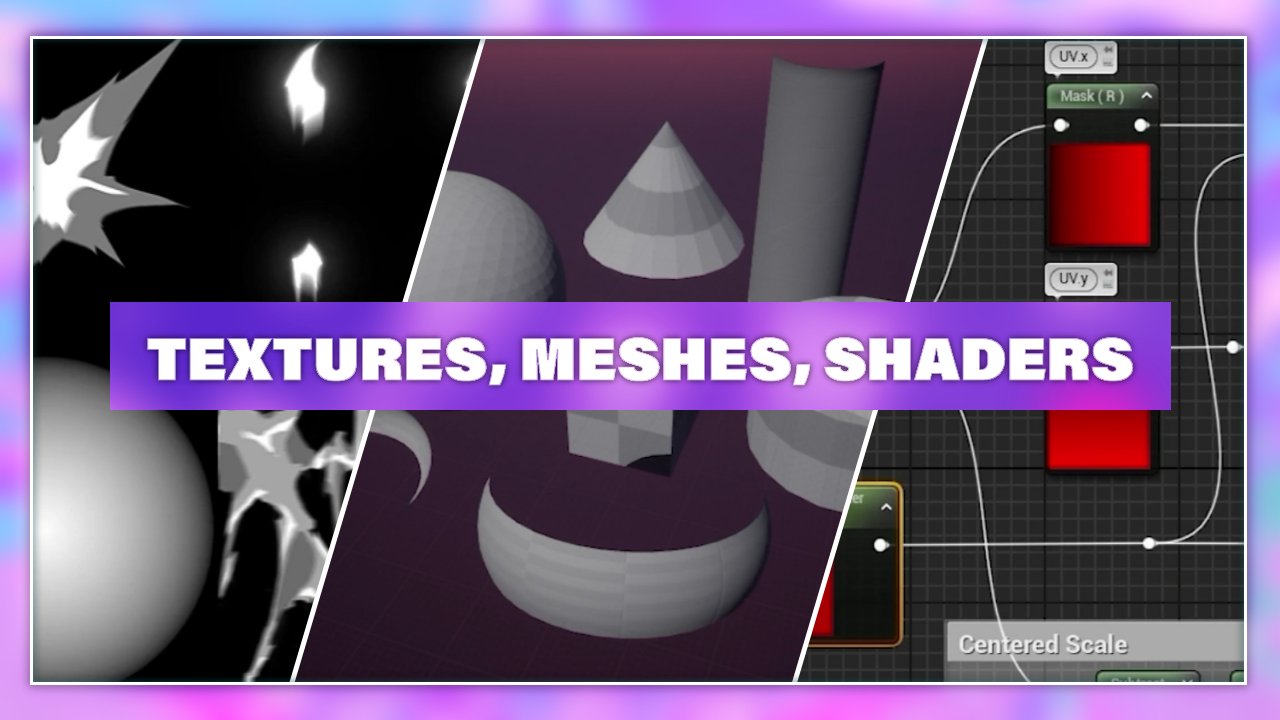
Every complex discipline becomes more approachable when we break it down into its components. Today, we're diving into the building blocks of VFX - What are they? How are they made? How are they used? And what role does each of these blocks play in visual effects development?
We'll explore how textures provide the visual foundation of an effect, how meshes give those visuals depth and form, and how shaders bring everything to life through movement, distortion, and other powerful effects. Our goal here is to demystify the VFX creation process and help you see beyond the flashy lights and punchy timing.
Textures
We can think of textures as the first building block of our effect. They're the pretty pictures we see at the beginning, and when it comes to textures, there are several kinds we use for various purposes, which we'll get into shortly.
The big takeaway is that an effect is often composed of many textures, not just one.
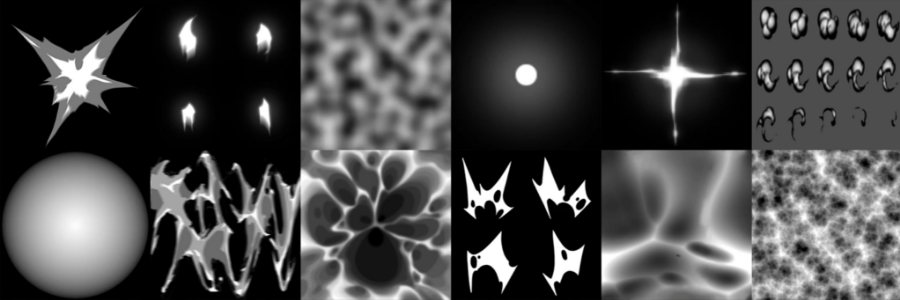
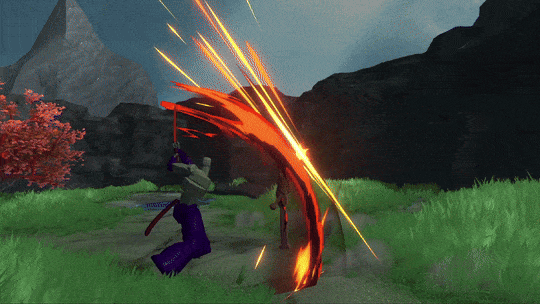
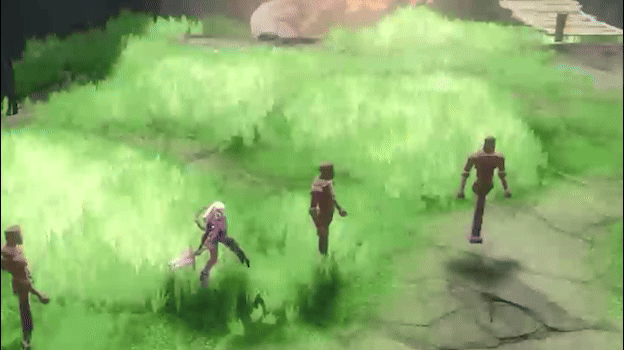
Now, what we're seeing here in this example is a completed effect: a very beautiful, fiery explosion with a fiery ring coming out of it.
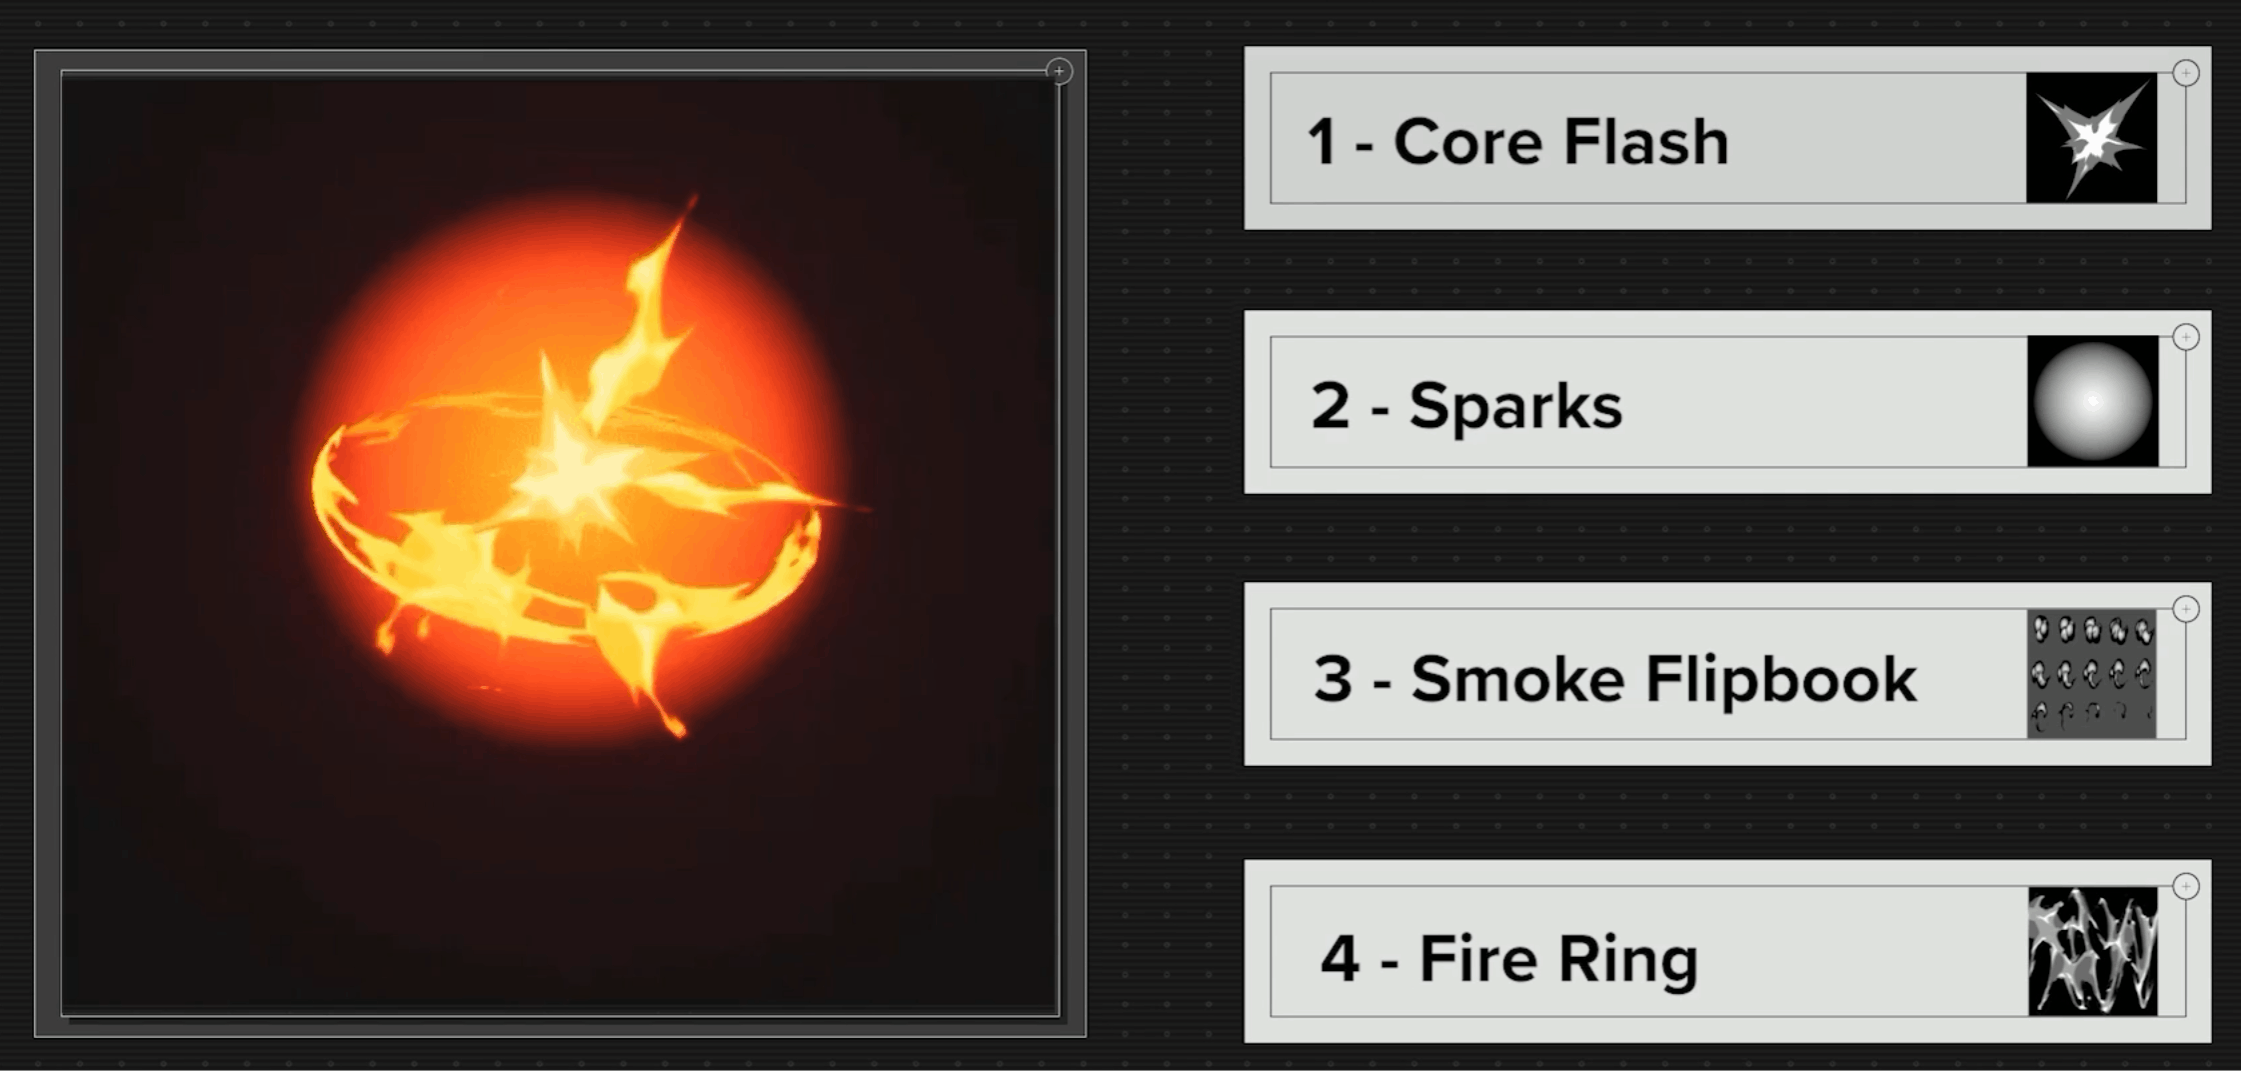
Let's break down some of the visuals into their base components. We’ll focus on four “main” textures that were used in this effect: those are not the only ones used, but they make up the majority of the effect.
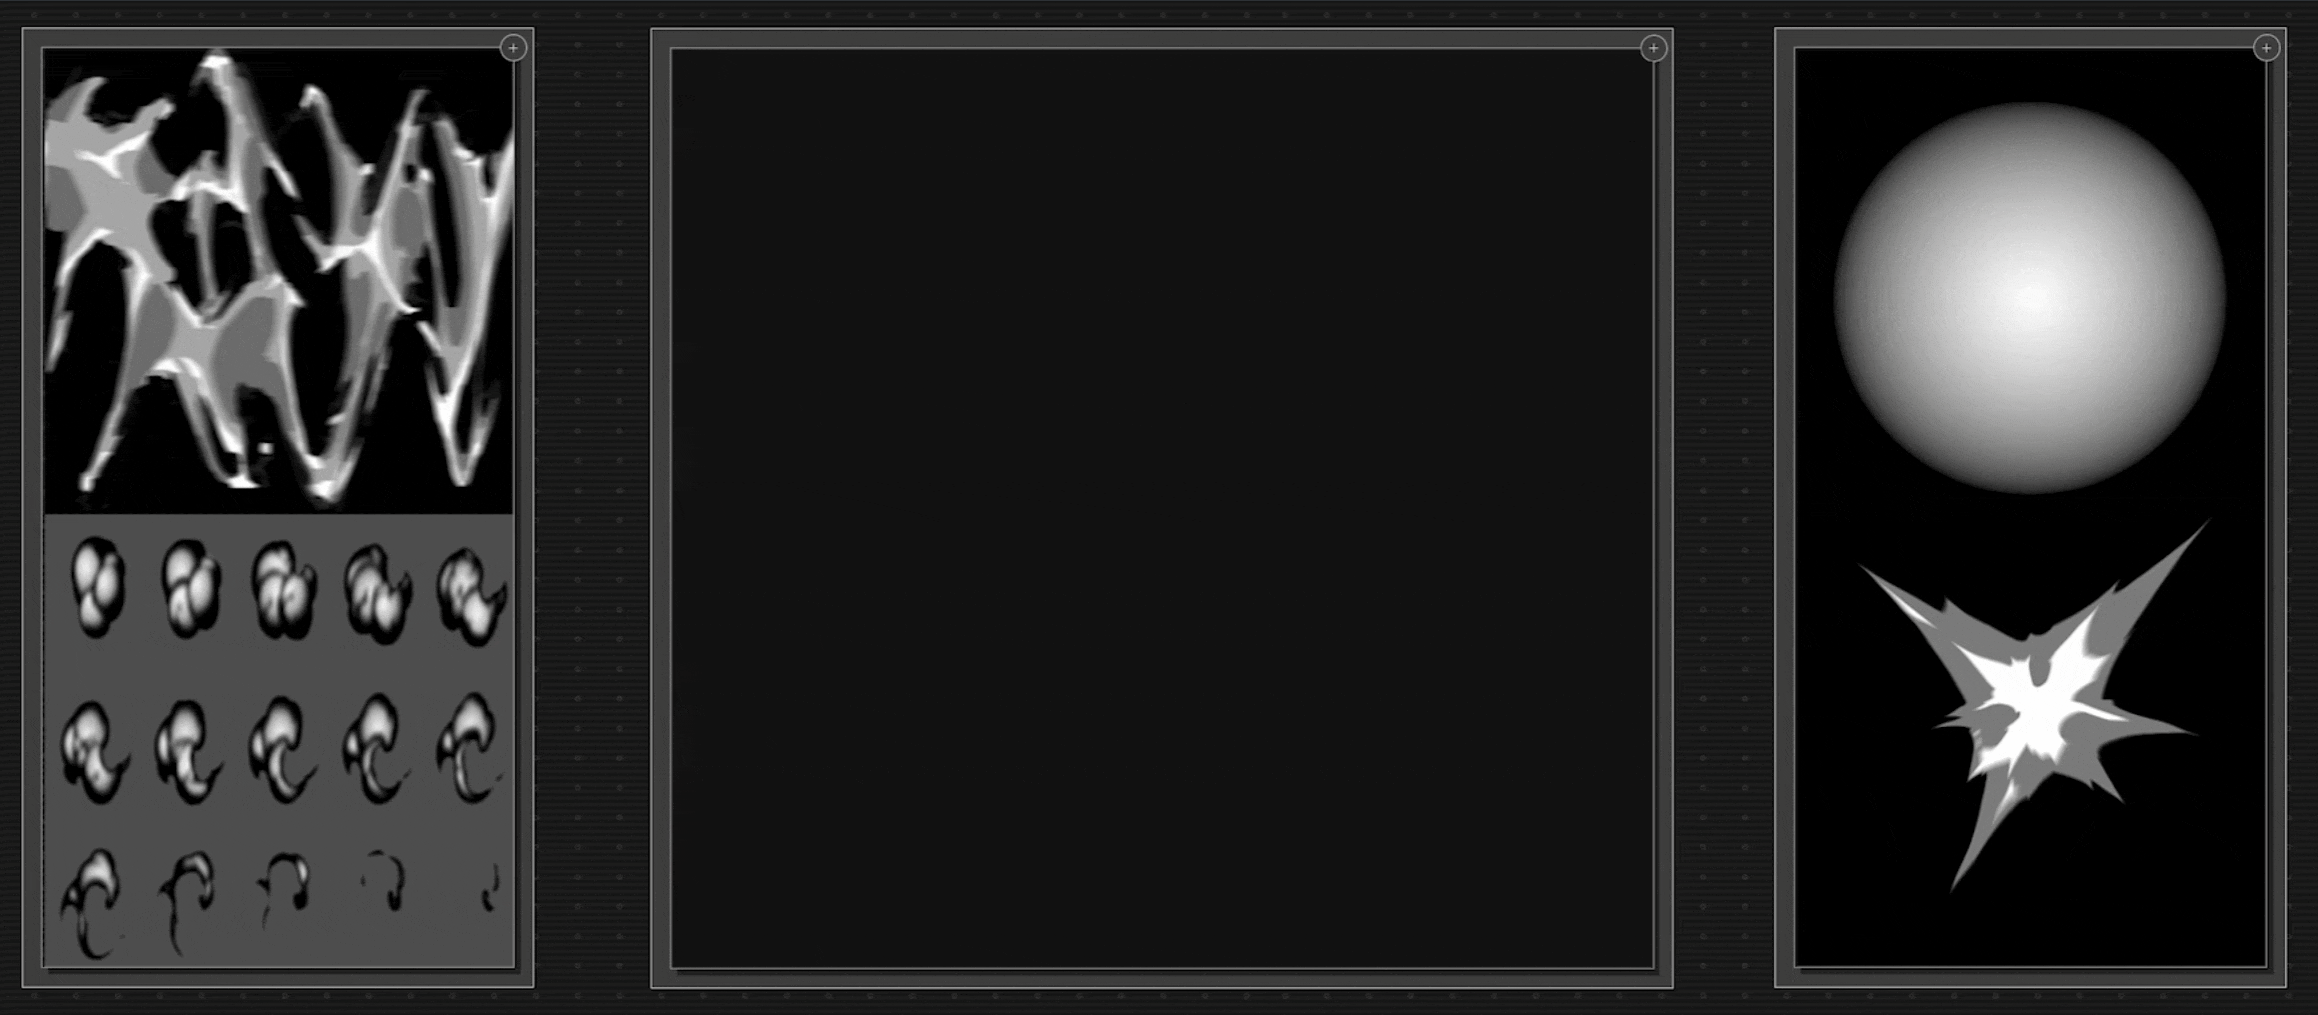
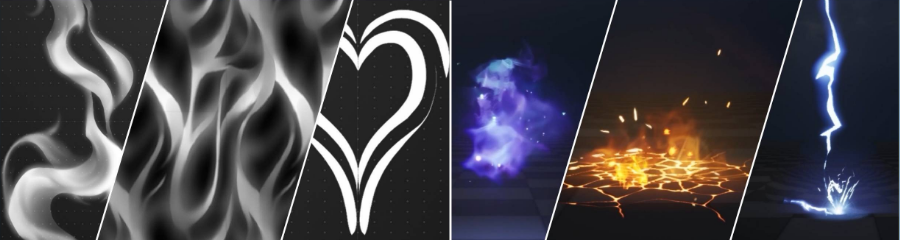
Core Flash and Soft Glow
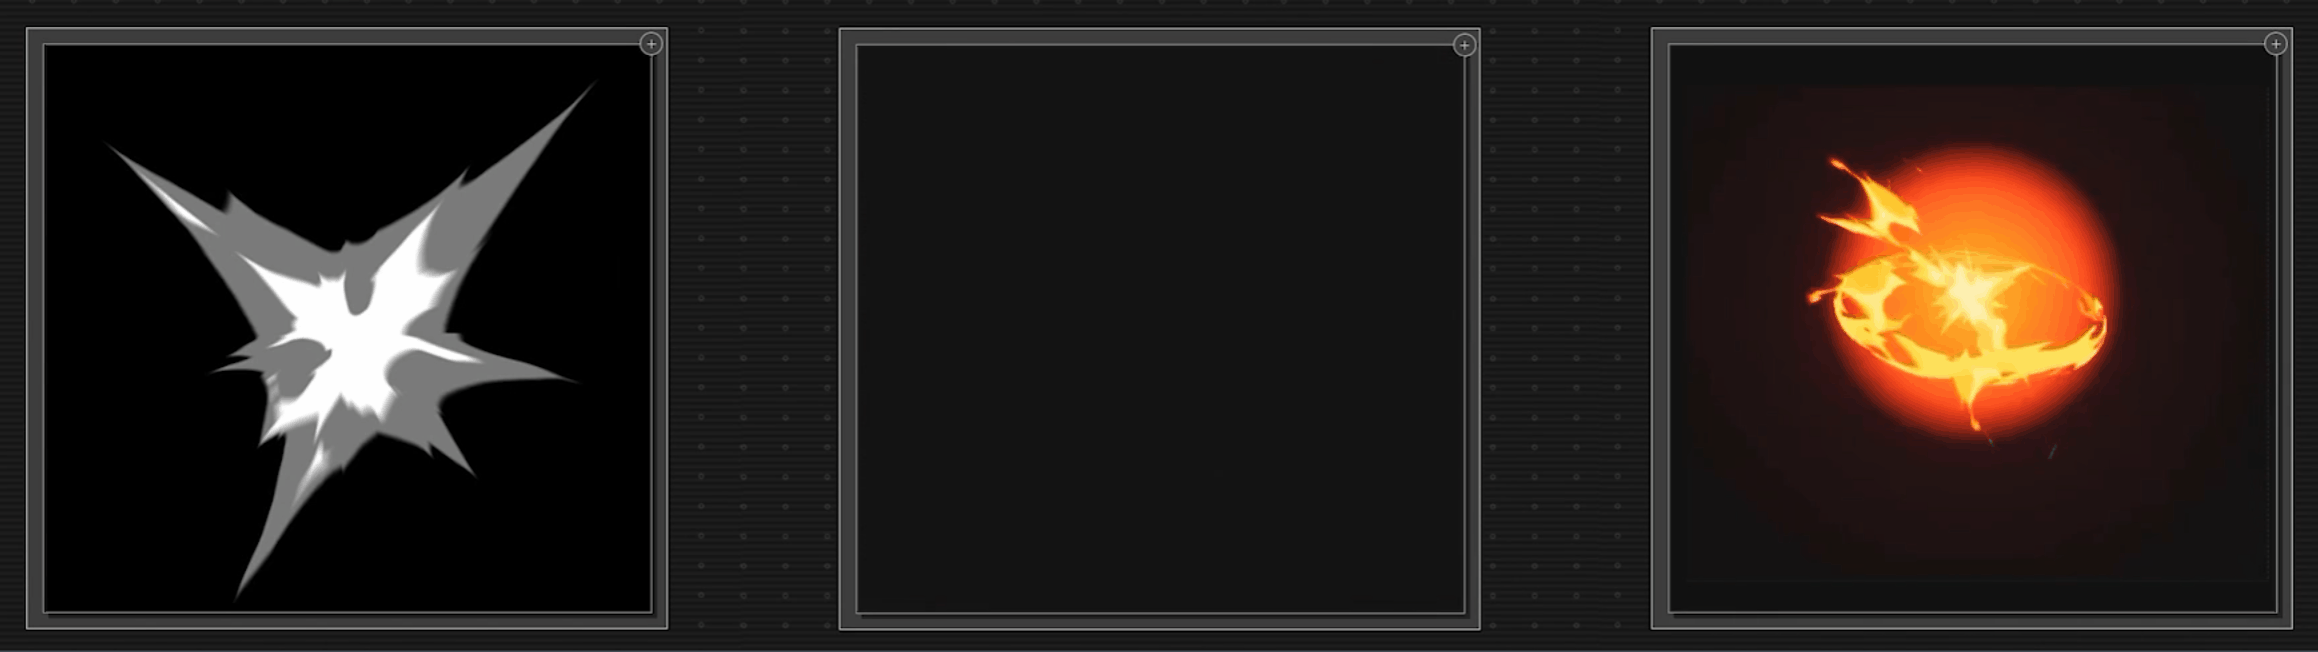
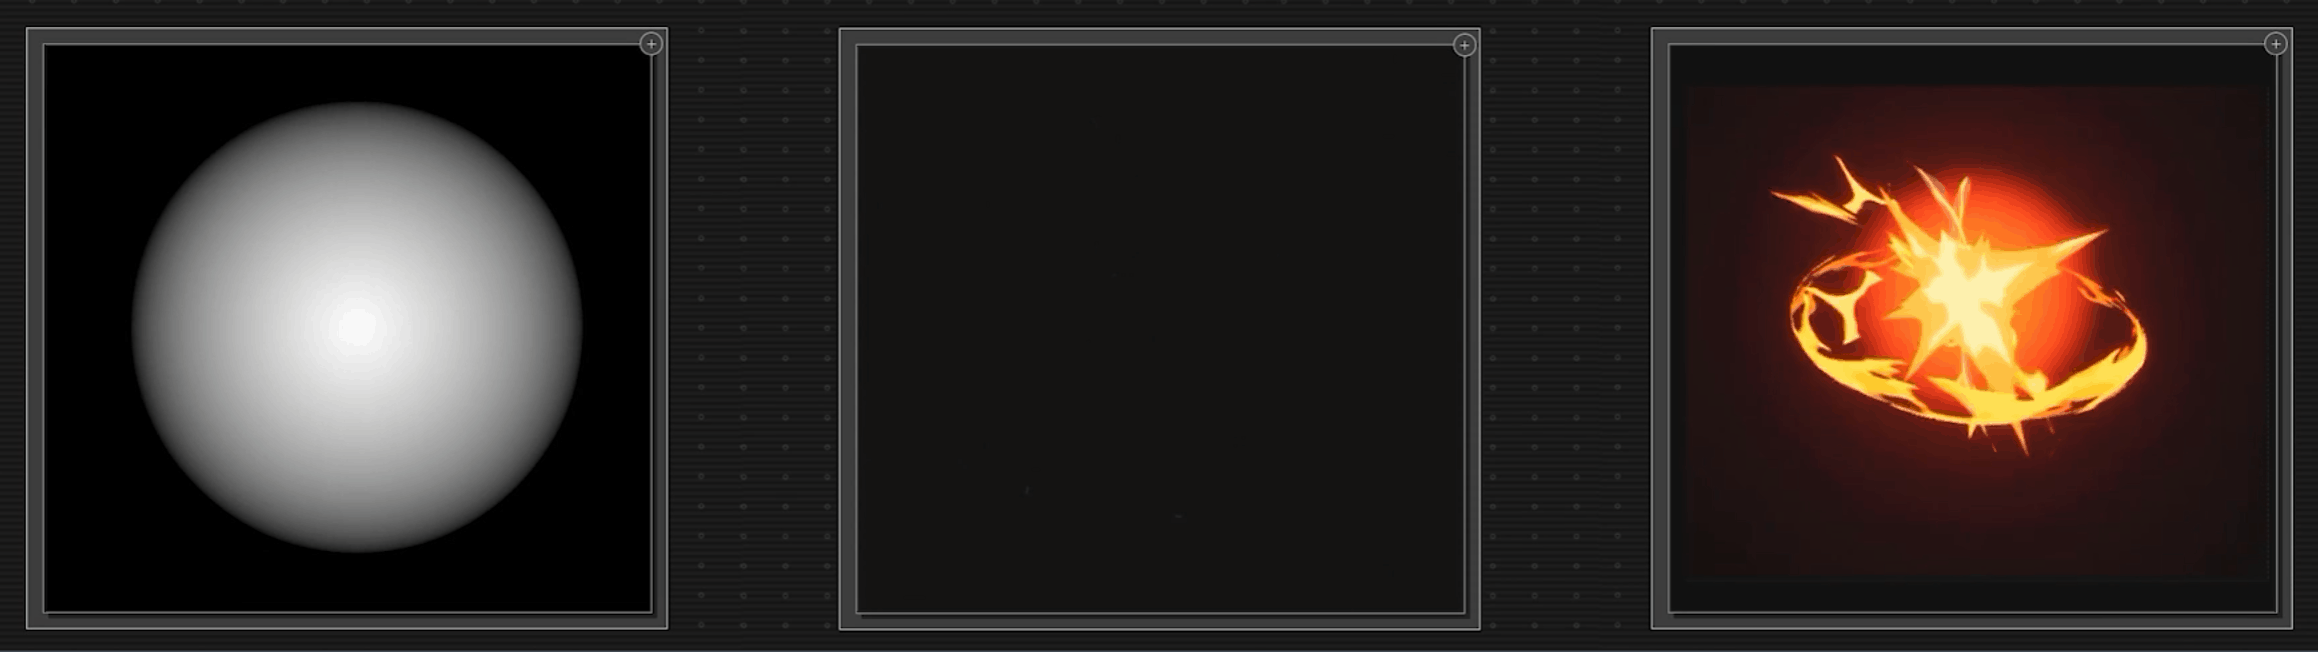
Starting off, we have a core flash that happens right at the beginning, and then we have a soft glow texture for our sparks. Both of these are non-tilable textures, and they're pretty straightforward. They give us the basic shape of our visuals, and we can adjust their size to be as large or as small as we need.
Flipbooks
Next up, we have a special texture called a flipbook. This type of texture allows us to embed an animation within it, which plays sequentially from left to right and top to bottom.
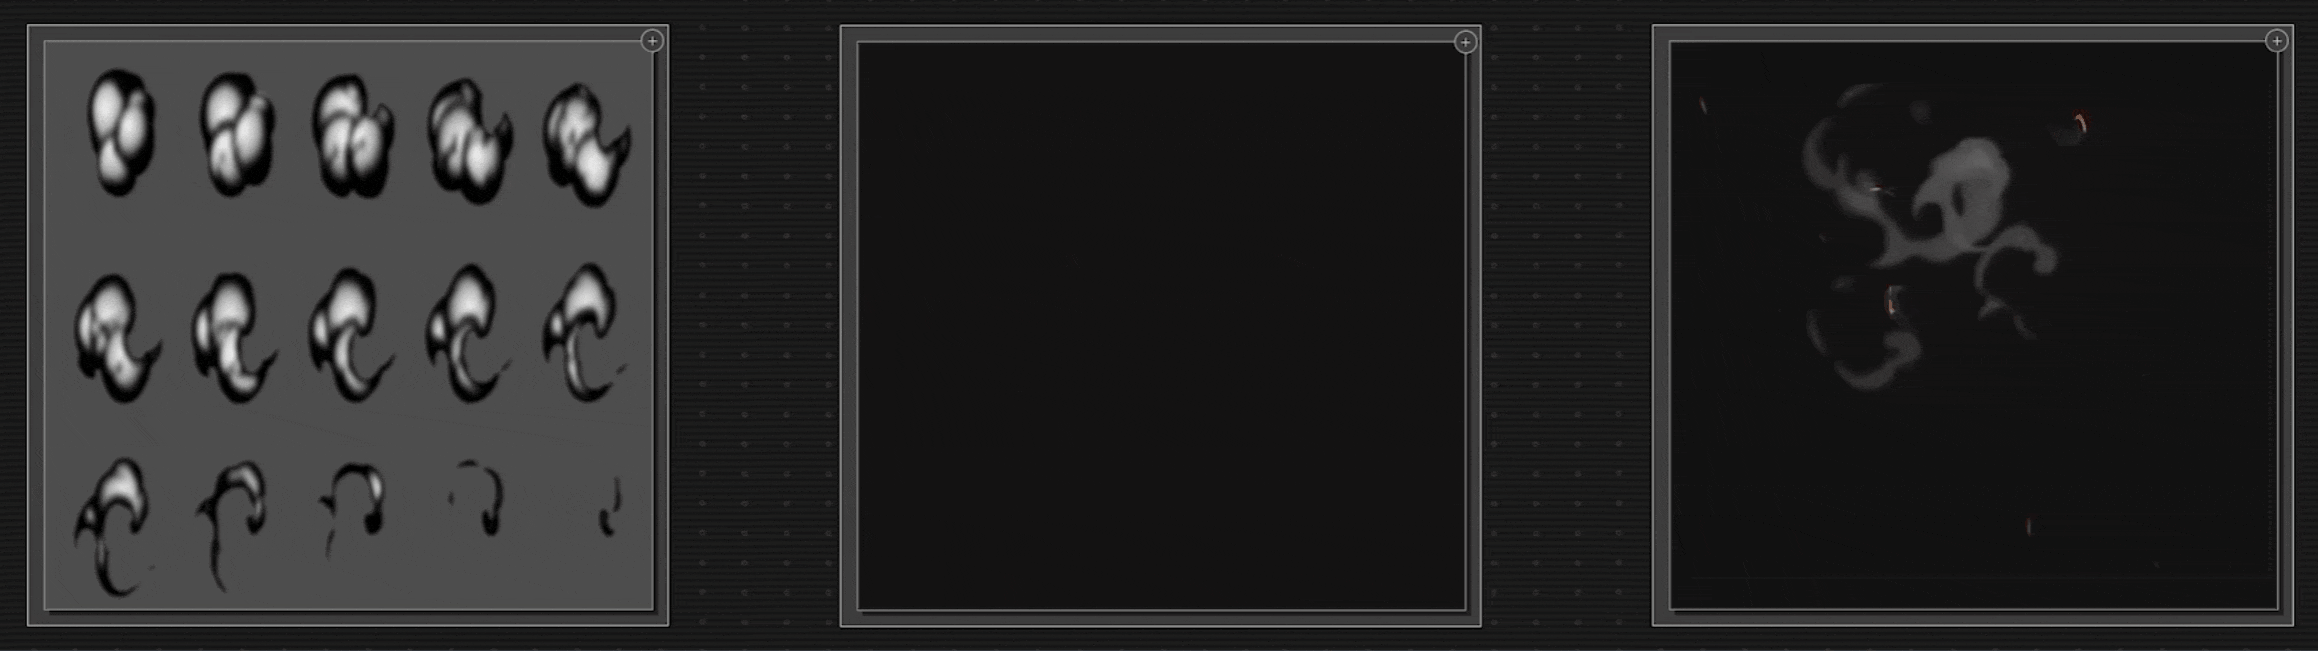
To a complete beginner, they can look a little strange - they're almost like textures within a texture!
Those are the different frames of an animation that have been shrunk down to an appropriate size to fit within a grid within that texture. Then we can feed that into our engine, and it can read each of those frames as if it were an animation. We can play that over a frame rate to get the actual animation that we're looking for.
Tiled Textures
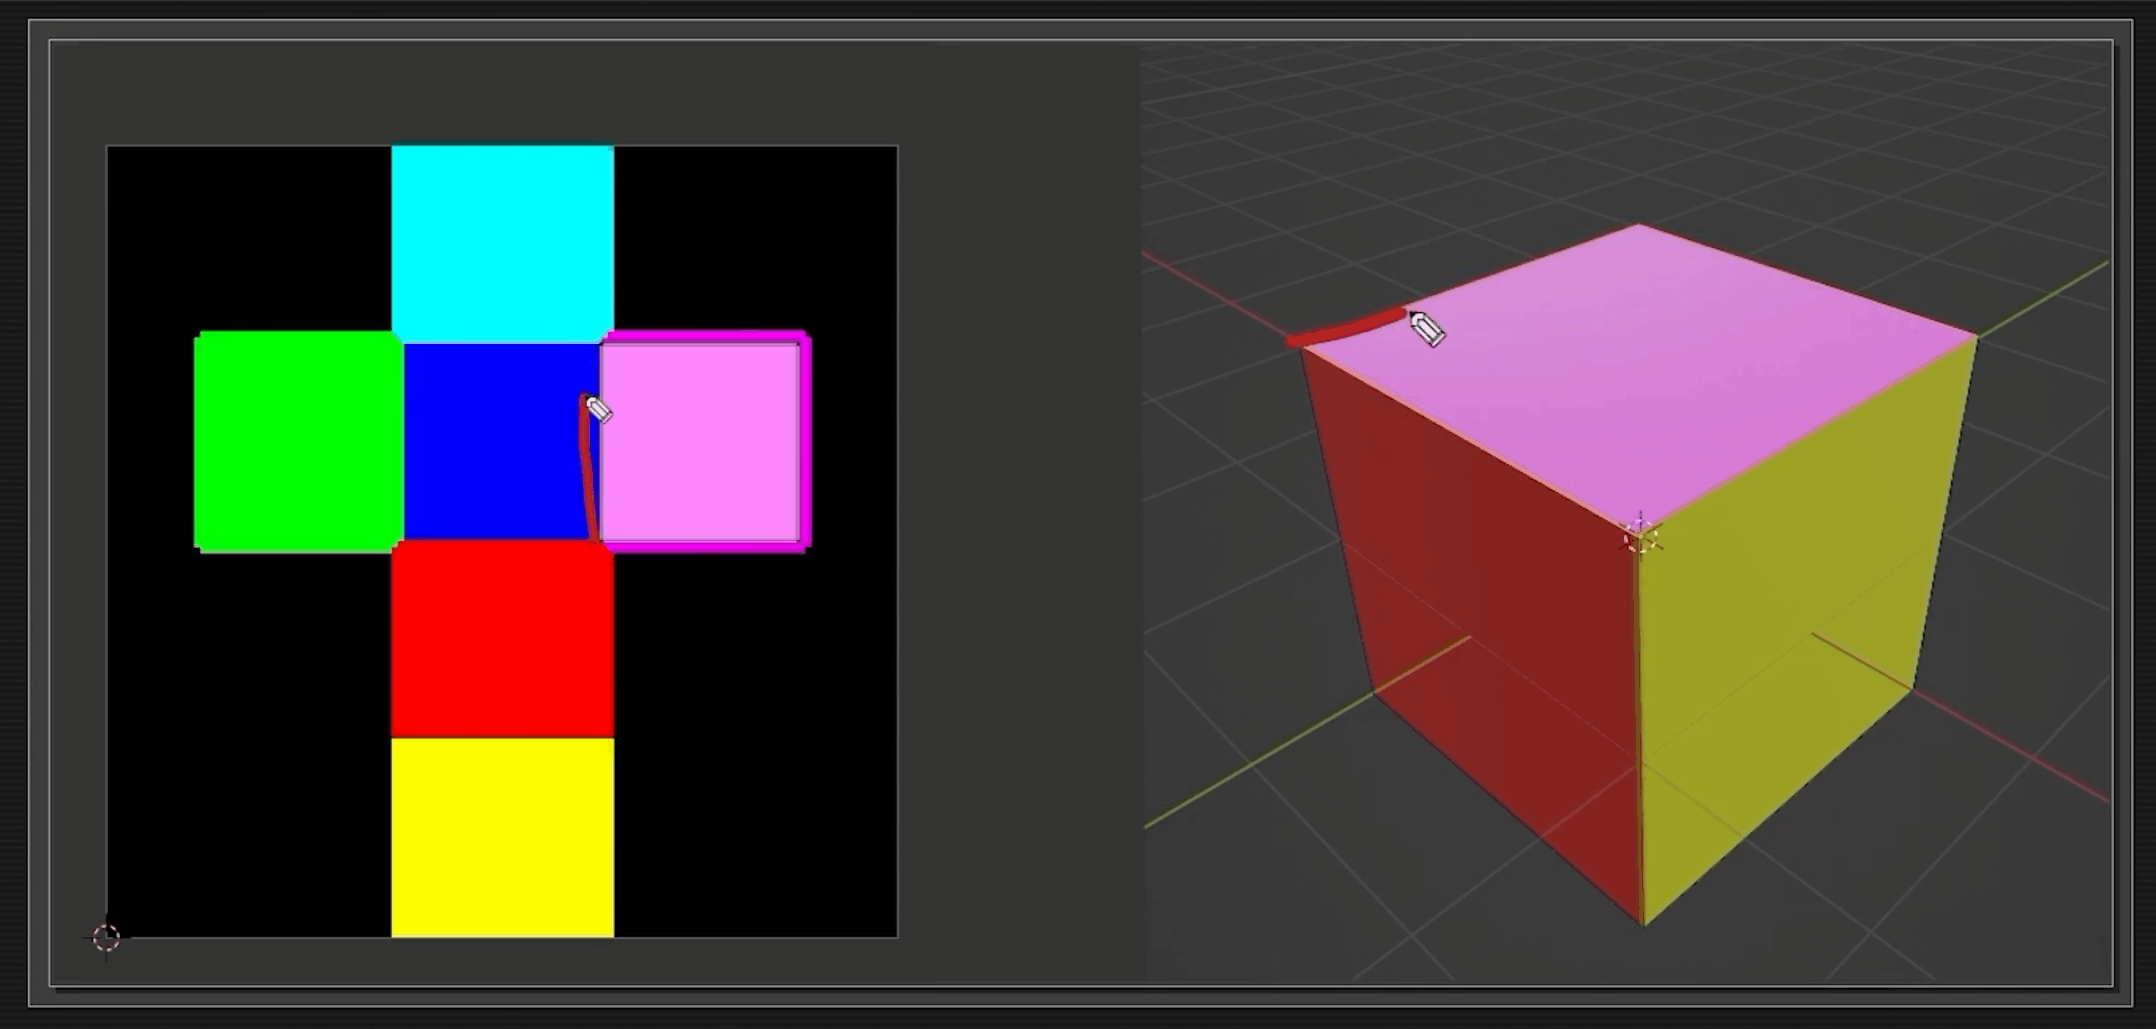
Finally, for this example, we have a tiled texture we're using for the fiery ring. Tiled textures are quite common, and we use them whenever we need a visual that repeats or moves indefinitely, either left or right, up or down, or a combination of those directions.
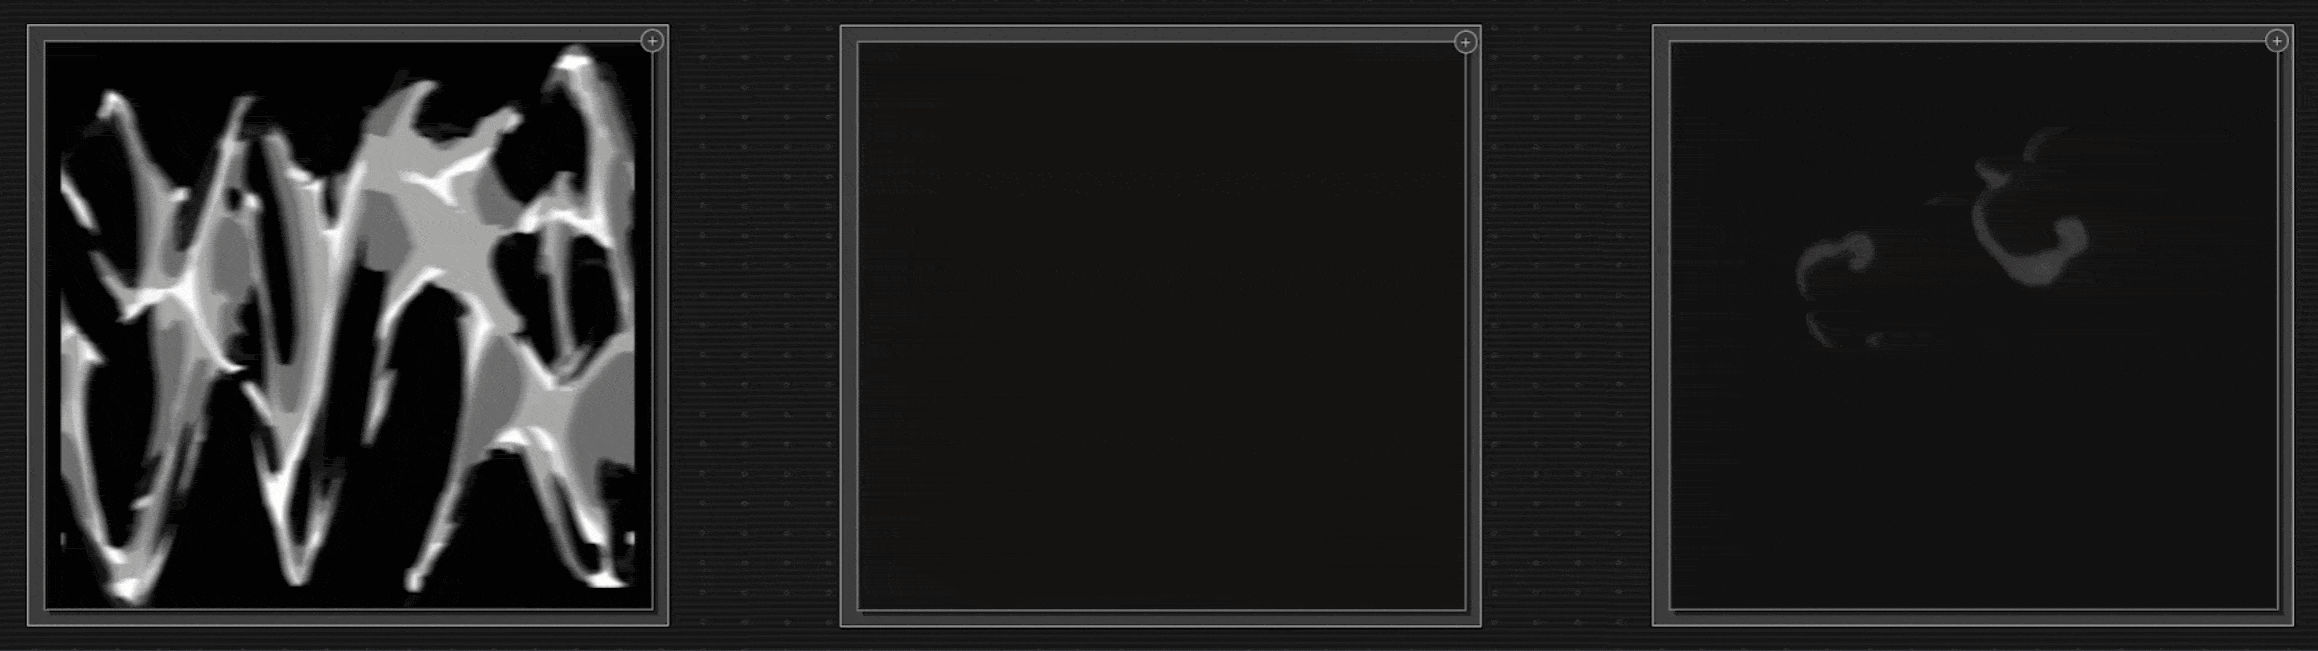
For an effect like this one, we can see that there's no single texture that drives the whole effect. Instead, it's a combination of all of these elements working together that gives us the composition.
You'll notice that the textures we've been looking at are all black and white. That's most commonly the case for these types of textures, but not always. That's because we can adjust settings like color and opacity within the particle system, which we'll talk about in more detail later.
So far, we've covered some of the most commonly used textures:
- Non-tiling images - give us the basic shape of our visuals, adjustable size, and other parameters
- Flipbooks - a texture that allows us to embed an animation within it, which plays sequentially
- Tiling of seamless - for a visual that repeats or moves indefinitely, in any direction
But some others are definitely worth mentioning.
Noise Patterns and Erosion Maps
Noise Patterns
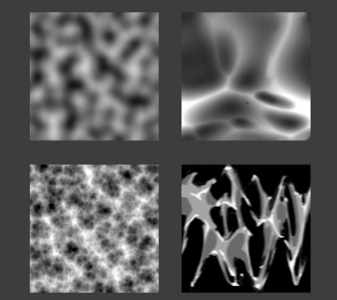
There are special textures called noise patterns. We can think of these as a random but organized mess that helps us emulate the chaotic patterns found in nature.
We use them in effects, but they're often not meant to be the star of the show, like that core flash or the flip book we saw previously. Instead, they work behind the scenes as a supporting element.
These kinds of textures help you add or subtract layers and enhance the visual interest in our effects.
Erosion Maps
Similar to noise patterns are erosion maps: just like the other textures we looked at, these are black-and-white images. Again, they're not meant to be the star of the show.

They drive the motion within that texture. If we want it to fade out in a very interesting way, we can use an erosion map to dissolve the visual rather than fading it uniformly.
Sprite Sheets
Sprite sheets are similar to flipbooks, but the main difference between them is that a flipbook is a sequence of frames that we use as an animation, and a sprite sheet is any arrangement of multiple frames within the texture.
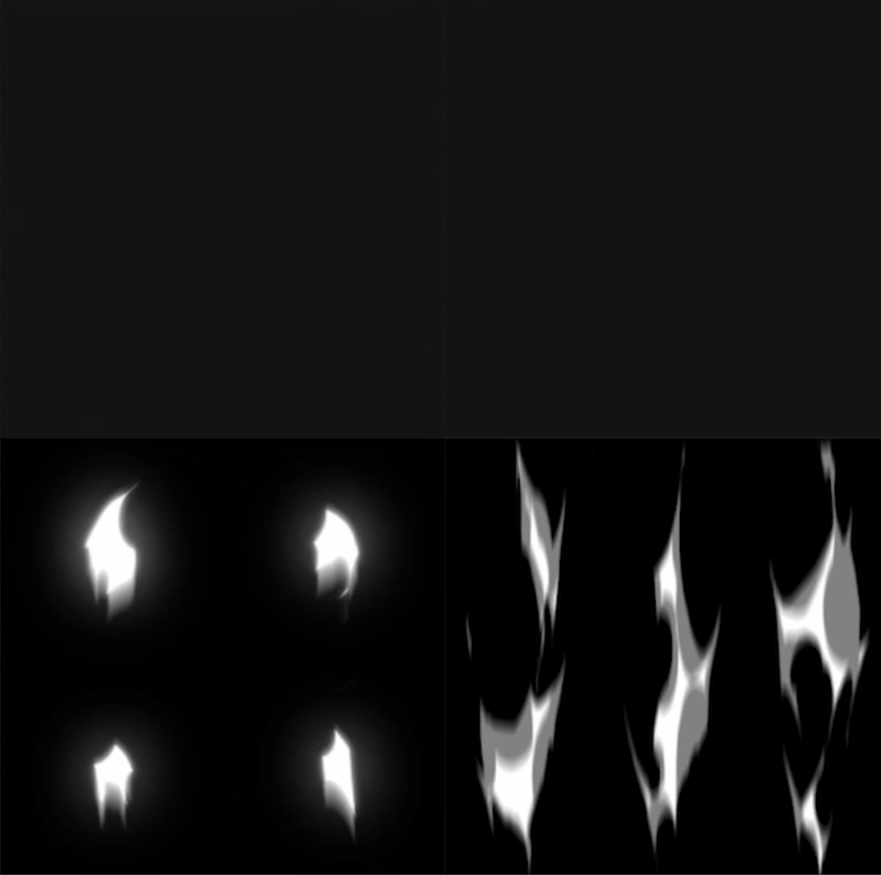
Adding variety in the shapes of repetitive parts of the effect can help break up the overall composition, creating variation that feels organic or believable.
Good effects really boil down to creating something that just looks like it belongs in the world that it's in.
Our eyes are really good at picking up patterns, so if we see the same visual repeated too often, they will pick up on it and recognize the pattern, which breaks the illusion.
How Do We Make Textures?
Here at VFX Apprentice, most of our textures are hand-painted, and we have some fantastic lessons over on the website that go into detail about that process. Hand painting isn't the only way to create textures, though.
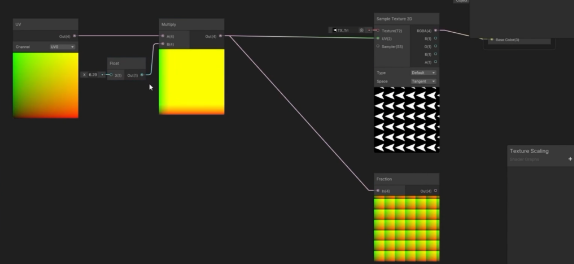
We can use programs like Substance Designer to create textures procedurally. We set up these textures using nodes, which are like building blocks of information that we can adjust and stack to generate our image.
Meshes
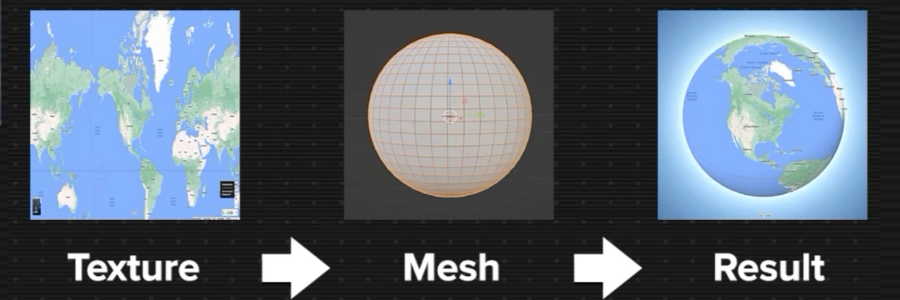
So next up is meshes, another building block for visual effects. These are three-dimensional objects that we can place our textures on. For example, we can think of a map of the Earth, and when we apply the 2D image of that map to a 3D sphere, we get a globe. Our image is wrapping around the shape of our mesh.
Meshes for VFX work much the same way, except that we have some more control over them. We can have them move across the surface of those shapes in really interesting ways.

We don't always use meshes for every effect, but they can be very powerful for giving a sense of depth to our effects.
Common Mesh Types
Some of the more commonly used meshes for effects are things like:
- Spheres
- Cylinders
- Custom shapes
These provide the canvas that we can apply a texture onto. Then we really start to bring the texture out from this flat two-dimensional space and give it some depth in all three dimensions.
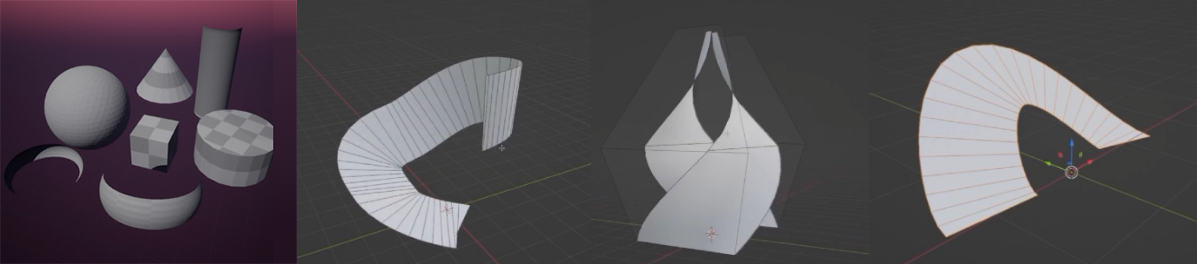
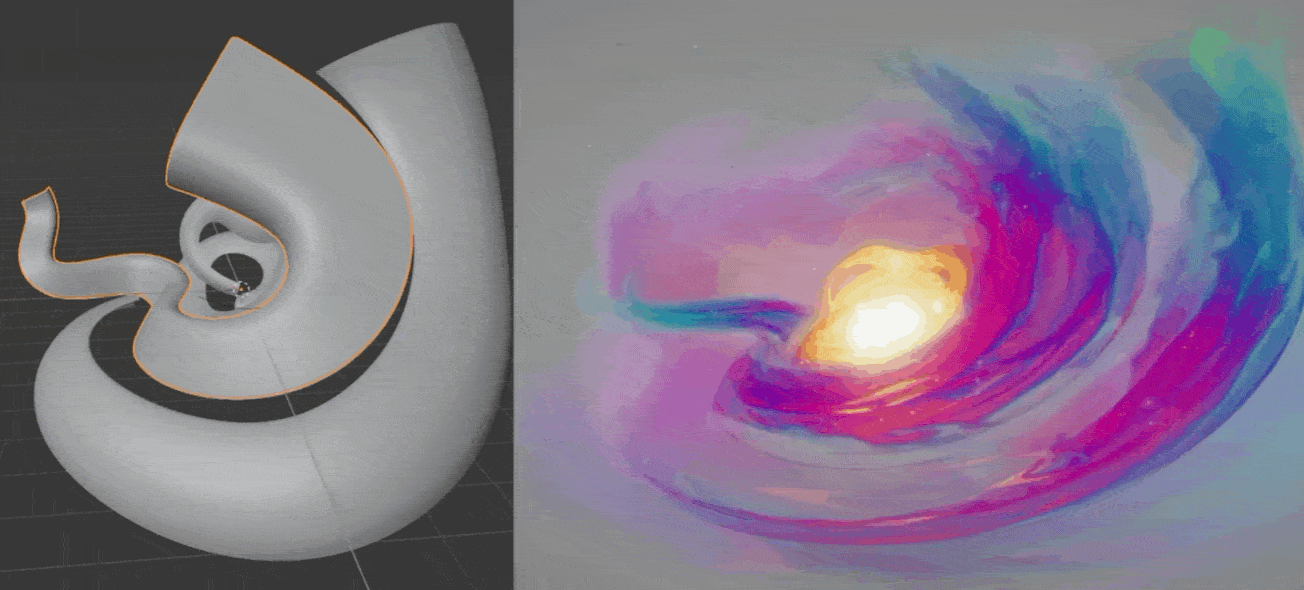
Sometimes we use custom mesh shapes to give that extra volume and dimension to the effects. Some common ones might be:
- Spirals
- Stretched out semicircles
We can use these to make swipes, slashes, shock waves, and just about anything that we need to push the effect away from feeling flat and instead give it some dimension and depth that makes it interesting.
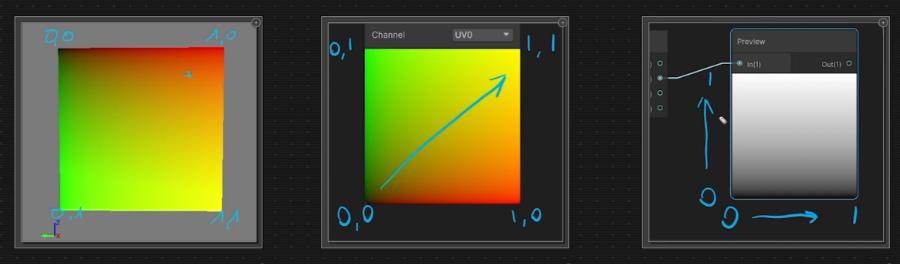
UV Mapping
UV mapping is the process of translating two-dimensional coordinates into three-dimensional coordinates. That sounds complicated, but it's really just how we wrap our images over the mesh shape.
For a mesh like a sphere, or really any kind of shape, you'll have your X, Y, and Z coordinates. This is left and right, forward and back, and up and down. But in the two-dimensional space, you really just have left and right and up and down with no depth axis in there.
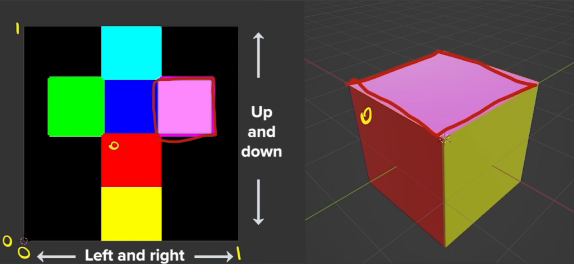
So, how these get translated between the two is the UVs. We can manipulate them to create interesting types of visuals to apply to our canvas or the mesh itself.
In VFX, we can use a variety of different meshes to shape out the composition of an effect. We can use everything from super simple shapes like spheres, cones, and cylinders, all the way up to highly customized and unique type meshes to fit a particular task.
Quads and Billboard Particles
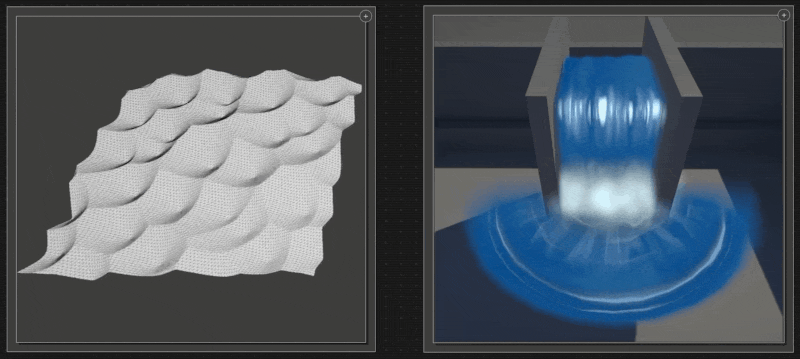
Another mesh type worth mentioning here, and one that's quite common in VFX, is the quad. A quad is a square shape that has a little diagonal line running through it, and that's because it's actually two triangles that are pieced together to form a square.
They're the default shape for many, if not all, particle editors, and because they're square, their ratio for the UVs is a one-to-one ratio. So if you were to apply your texture onto a quad, it's going to represent that in a one-to-one space just as it is when you're viewing it in any other format.
Another interesting thing about default quads is that they're camera-facing. No matter where you rotate or move within the game scene, they will always face directly at the camera unless you tell them otherwise.
We could have quads arranged in other facing directions, but by default, they face the camera, and we most commonly call these billboard particles. They're kind of like billboards that you might see on the sides of the road.
Creating Meshes
To create meshes, there are a variety of programs we can use:
- Autodesk Maya
- Autodesk 3ds Max
- Blender
It doesn't really matter as long as you're using a system that you're comfortable with.
That's really the most important aspect: you can find shapes on the internet and download plenty of different meshes, but to really get the most value out of what you're working with, it's highly advisable to use a program you can modify or edit if need be. Being able to jump in and change it up slightly can really help!
Shaders
For this final segment, let's talk about shaders. We've talked about textures, which are the pretty pictures that we're using - the visual element that we see first.
We've talked about meshes. They are the canvas that we're applying those pictures onto. Shaders are how we use those images across our canvas. They're how we manipulate them in order to do a variety of different tasks.
Put very simply, a shader is a combination of some visual math that allows us to manipulate our textures in really interesting ways.
You might have heard the terms "shaders" and "materials" before and wondered: are they the same? Technically, the shader is the math and the logic, and the material is our interface - how we use that shader.
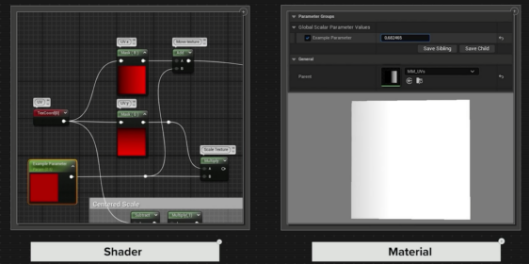
How Shaders Are Made
Some shaders are manually created using code, this used to be the only way to make them. You used to code them yourself, and some artists still prefer this method. Most shaders today are put together using a visual node system, like the material editor and shader graph in Unity, and much, much more. They allow us to visualize all of that math happening behind the scenes.
Shader Use Cases in VFX
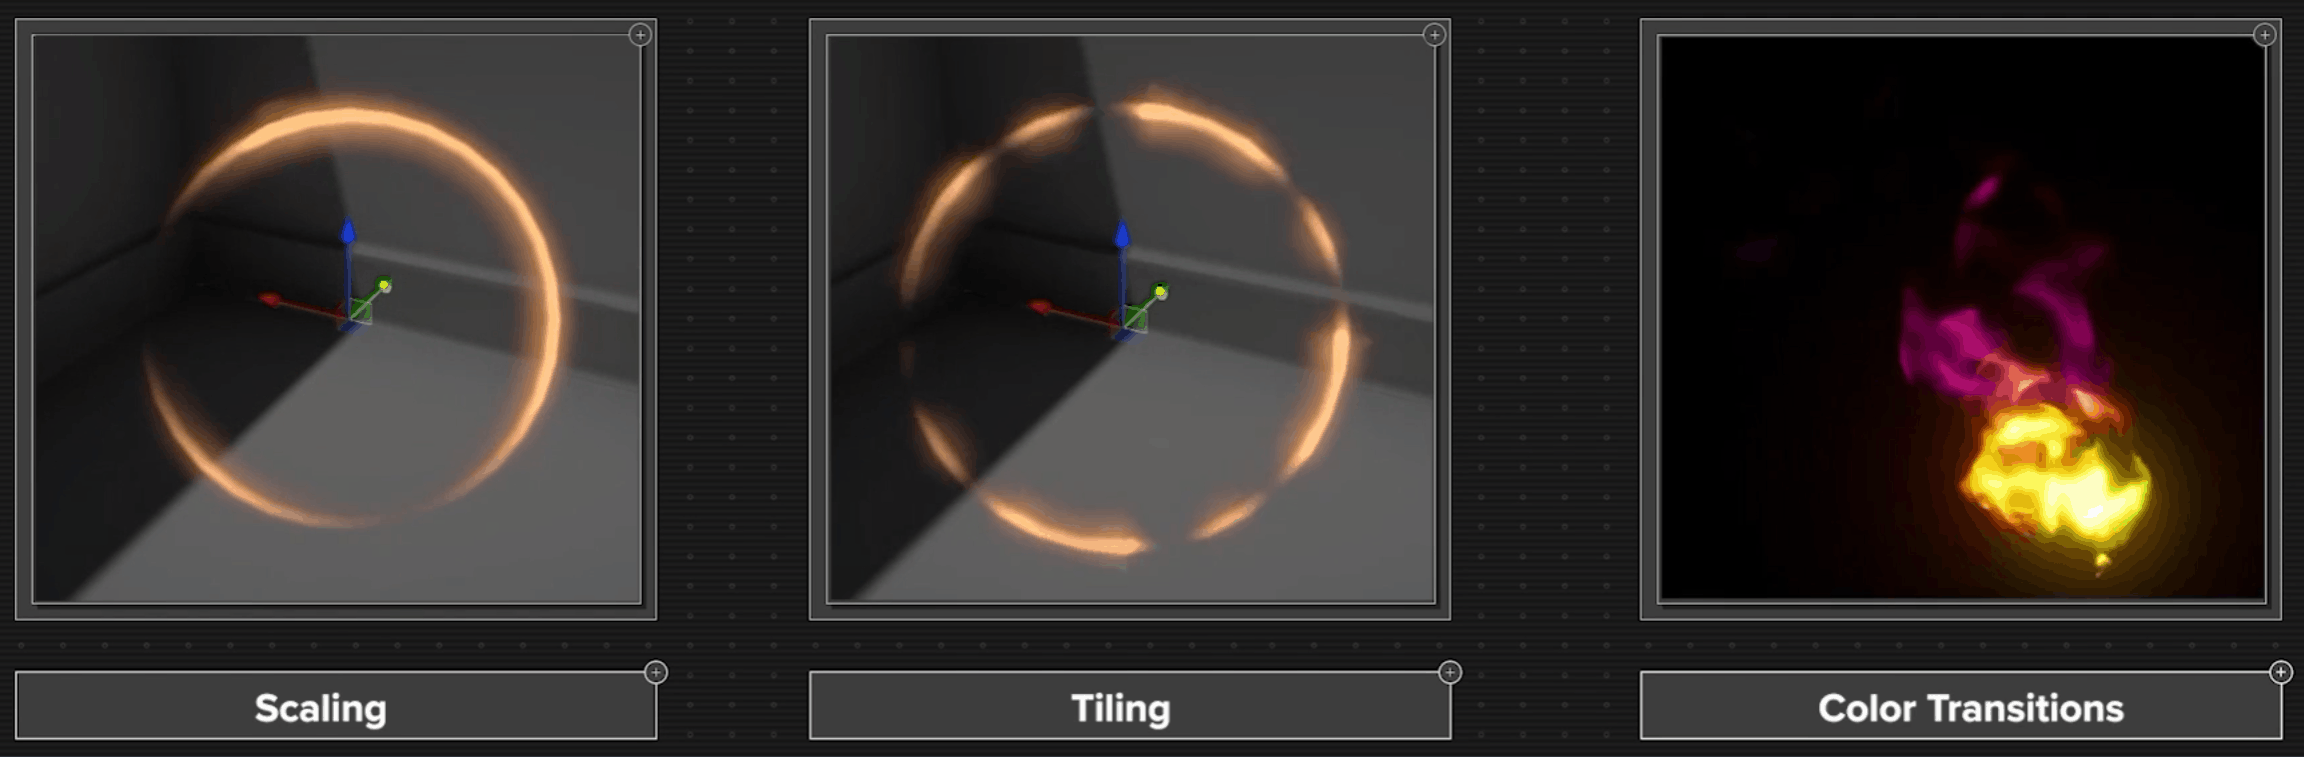
Now let's talk about the use cases — how we use shaders for visual effects. There are a variety of different ways we can use shaders in our visual effects to accomplish different tasks and create very interesting things.

Some of the more commonly used applications include:
- Positional movement
- Scaling
- Tiling
- Changing color over time
Distortion Effects

We could use the shader to create a distortion effect where it ripples the light and bends it slightly. Much like how you see the air rippling off the hood of a hot car on a hot summer day.
Dissolve Shader
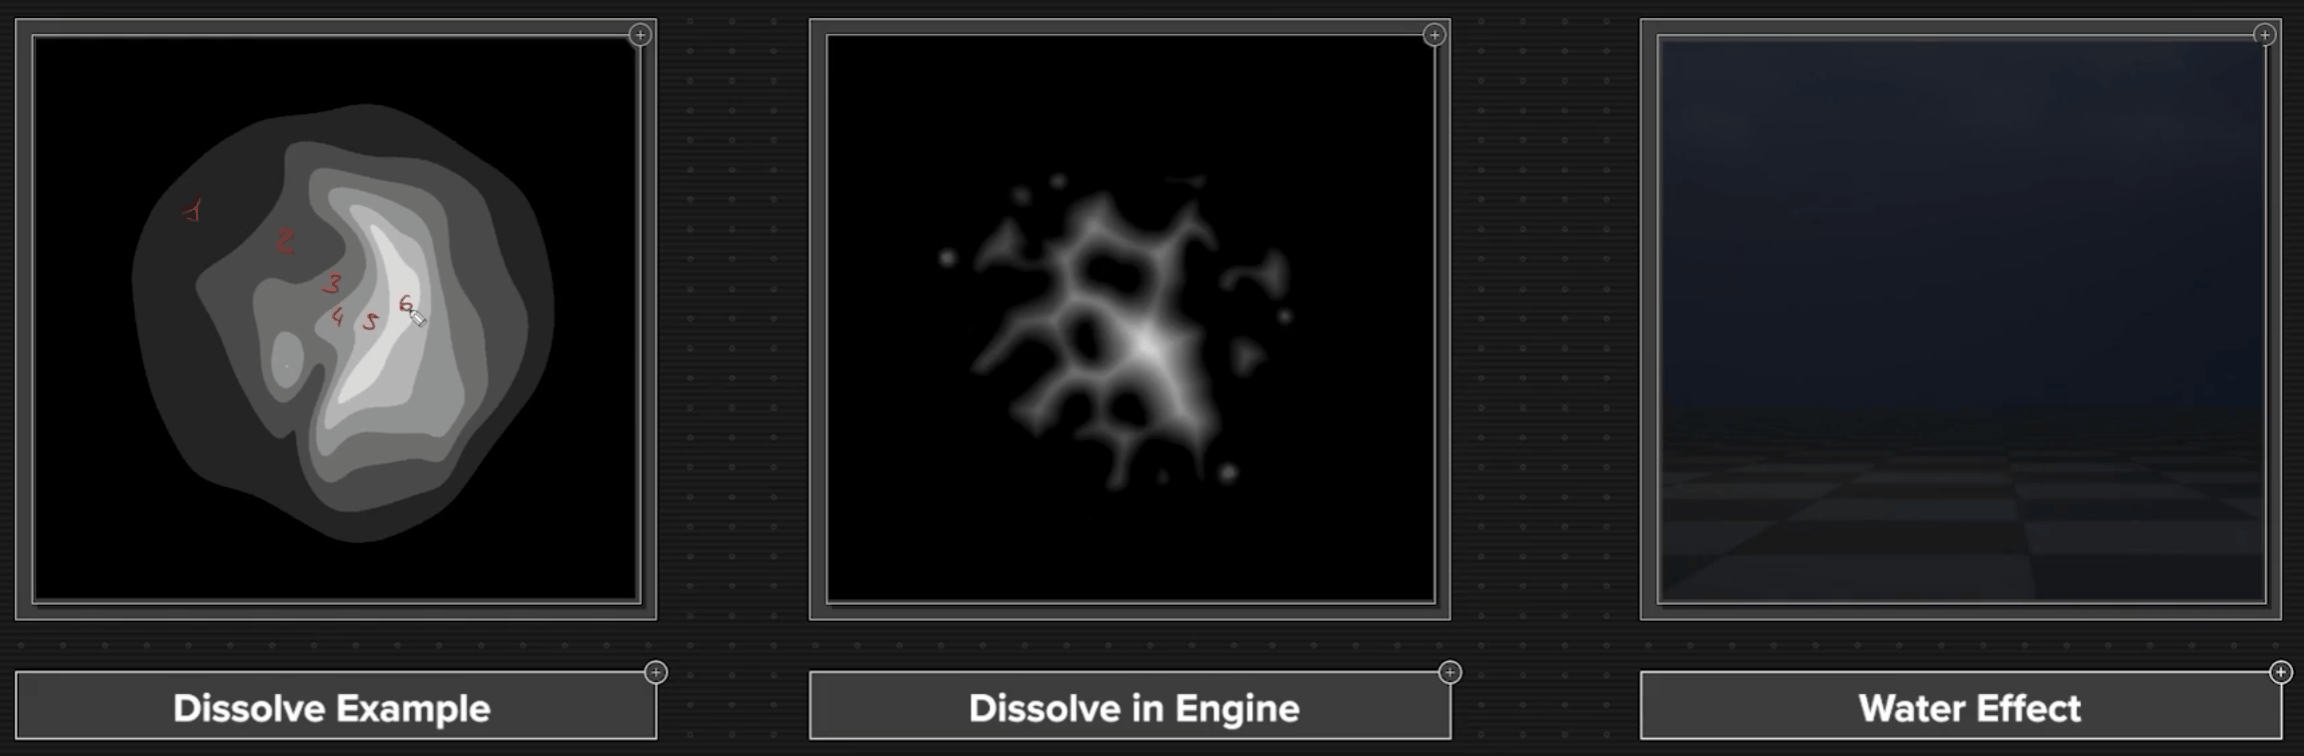
Another interesting use case is creating erosions. This allows us to sort of eat away our texture in a more interesting way than just fading it out uniformly off of the opacity. We can tell one part of the texture to start disappearing before another, creating some really interesting movement within our particle.
Vertex Offset
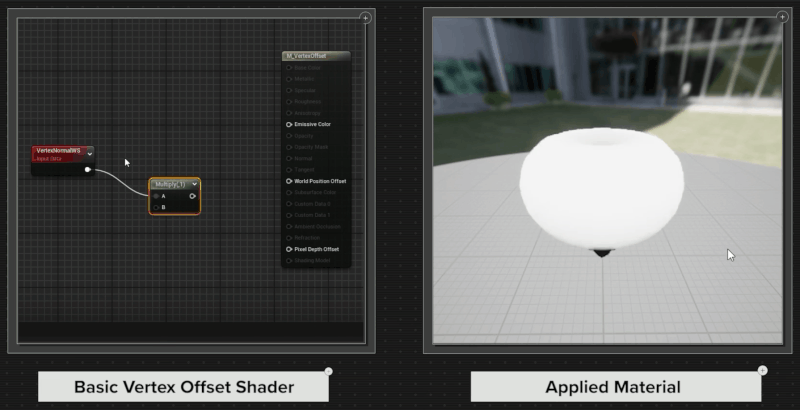
One more cool thing that we could do with a shader is something called vertex offset. The things we've been talking about before with shaders really deal with the texture itself, but with vertex offset, we can use the shader to interact with the mesh that we're using.
Meshes are created by these little points called vertices, and when they're all together, they create the geometry of the shape. What a vertex offset can do is grab those little points that make up the shape or geometry of the mesh and start to manipulate them in really interesting ways.
This is a really cool method of creating things like water ripples or effects that look like they're breaking up and not feeling very static. Liquid and water type effects can really benefit from having a vertex offset applied to them.

Bringing It All Together
These are just some of the most common uses for shaders in visual effects, but certainly not the only things that can be done. There's a deep well of possibilities we can draw from when it comes to shaders, unlocked by the power of math, which is pretty beautiful.
A visual effect tells a story. It has a beginning, a middle, and an end. Shaders are how we tell those stories, and when they're used in concert with good textures and good meshes, they can be really powerful.
So to recap:
- The visual part of VFX is the combination of textures, meshes, and shaders: they work together at the hands of the artist to create compelling visuals for our effect.
- Textures are the visual foundation of an effect, ranging from non-tiling images and flipbooks to tiled textures, noise patterns, erosion maps, and sprite sheets that add shape, motion, variation, and detail.
- Most effects are not driven by a single texture, but by multiple textures working together to create a cohesive composition.
- Textures can be created through hand-painting or procedural methods, giving artists flexibility in achieving different visual styles and workflows.
- Meshes provide the three-dimensional canvas for textures, allowing effects to gain depth, volume, and form through shapes such as spheres, cylinders, quads, and custom geometry.
- UV mapping connects two-dimensional textures to three-dimensional meshes, making it possible to wrap, position, and manipulate visuals across different surfaces.
- Shaders act as the logic and visual math behind an effect, controlling how textures behave through movement, scaling, tiling, color changes, distortion, dissolves, and vertex manipulation.
- When textures, meshes, and shaders work together, they transform simple assets into effects that tell a story with a beginning, middle, and end, creating visuals that feel dynamic, believable, and alive.
Start your visual effects journey and learn all about the world of game development and stylized real-time VFX. This free-for-all course will introduce you to the various departments, game styles, tools, and systems used to create game effects.
More Like This:
- Kitbashing: The Most Efficient Way To Create VFX
- The FX Artist's Guide to Area of Effect (AoE)
- A 3-minute Color Theory Lesson
- What Riot Games Head of Creative Looks For in VFX Artists
Learn VFX for Games and Animation
Are you ready to elevate your VFX skills and work on video games and animated projects like the pros? Our VFX courses are led by FX industry leaders who will not only guide you through fundamentals, they will prepare you to work at leading studios and VFX houses.
Start Your VFX Apprenticeship
Begin your journey towards mastering FX for games and animation. Join VFX-A All Access and discover cutting-edge 2D, 3D, and real-time FX training.